
YU Can Do It: Realistic Strawberry Drawing Tutorial
- maxlalondee
- Jul 11, 2025
- 3 min read


With the warm weather that's been knocking at our doors, there's no doubt about it: summer is well and truly among us! To celebrate the sunniest time of the year, what better way than to draw the most emblematic sign of the season?
Welcome to YU Can Do It, a series where we teach you how to draw realistically, with any art tools and any level of experience. In other words, it's realism that anyone can do!
Today, we'll be teaching you how to easily draw a realistic strawberry that'll impress all your friends and family. This can be done in any medium you'd like, so pick up your favourite, follow along this simple tutorial, and don't forget to share the results with us!
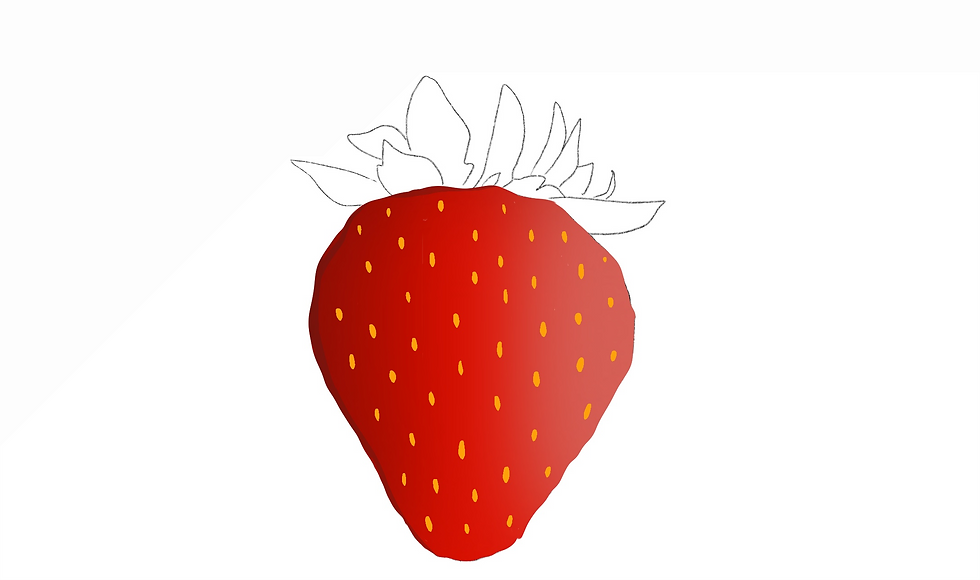
Step 1
To begin, we'll need to draw the body of the strawberry. Think of this as a narrow triangle with the pointy end downwards and the edges rounded. Make sure that your outline is slightly squiggly to represent the little ridges you see on the the fruit. This part of the tutorial is error-free, so if your image doesn't look like the one below at this point, no worries! The outcome will look similar nonetheless.

Step 2
Next, draw the leaves. This consists of a series of thin, squiggly triangles that overlap eachother. Some of these may be curved, and others may have a slight cut in them. Again, this part is up to interpretation, so draw as your heart desires.

Step 3
Once we have the general outline of our strawberry, we can begin with what will bring our artwork to life: colour! To begin this step-by-step process, we will block out our colour. We will need four different shades of red at this point. First, use a dark pink of the right-left side of the berry's body. Then, use a bright red in the middle third, and a darker red on the left-hand side. Finally, using a bright-red, thinly outline the boarder and upper portion of the strawberry.

Step 4
The next step is one of the most important to making your work look realistic. It's time to blend! The technique you will use to do this will depend based off what medium you have selected. If you are working with coloured pencils, watercolour, or markers, you will need to work the mediums into each other, creating multiple layers. If you are using something like oil pastels, you can blend the medium with your finger

Step 5
A strawberry wouldn't be a strawberry without its seeds! Take a yellow-coloured art supply and scatter little oval shapes randomly around the body of your fruit. These don't need to be in any specific order, so have fun!
Step 6
In step 4, we saw the importance of shade and highlight in making our work look realistic. This is the exact same thing with the seeds. In this step, lightly shade the left side of the seeds in brown, and the right side with a pale pink, making it blend in with its red background.

Step 7
We want our strawberry to look glossy and delicious, and highlights is how we make this happen! Since the right side of our work is what we drew the lightest initially, this is where most of our highlights will go. Using a very light pink shade, surround most of the right-most seeds in a squiggle and colour it in. Place a thin line around each seed. Experiment with here you place your highlights to get different effects!

Step 8
A strawberry simply wouldn't look like a strawberry if it didn't have leaves. Colour this part in with a light green, and outline it with a darker green, leaving some spots free of highlight.

Step 9
All leaves have veins. To draw these, we will take a lighter shade of green and draw lines branching off of eachother. Take this oppertunity to also make highlights, placed on the tops and sides of the leaves.

Step 10
It's the final step to our tutorial, and as with the body of the strawberry, we will lightly blend in the leaves to get a softer, less cartoon-liked effect. Once we have done this, we have a beautiful strawberry artwork that will impress everyone you show it to!

Did you try out this drawing? Share it with us by tagging our Instagram and Facebook pages. We can't wait to see what you've come up with!
If you know someone who would like this, share this blog post with them using the button below.
Summer is a great time for artists to get inspired, so why not enjoy with fun drawings like this one? There's no better way to commemorate the season, so get out into the sunshine, get creative, and draw!


Comments